For this project, what we were assigned to do find a solution on “How to reduce loneliness”.The process involved researching and defining the problem, performing several ideation sessions to come up with various solutions, and in the end developing wireframes and a prototype of our final service
This was a group project, where all team members contributed equally and collaborated for transforming a problem statement into a service solution. We all worked together for defining the problem, ideating solutions, visualizing our concept in lo-fi, while I individually created the high fidelity prototype presented in this case study.
Problem
In order to get a better understanding of the problem scope of how to reduce loneliness, and to be able to provide a problem definition and its sub-categories, we reviewed several pieces of current literature. What we understood was that loneliness affects people of all kinds. A lot of research has been conducted on the health-deteriorating effects of loneliness of elderly people, but the COVID-19 pandemic and the related restrictions (such as remote studying) have also had a major harmful impact on young adults’ sense of loneliness and shown the youth’s vulnerability to the issue, as well. Vulnerable groups like immigrants and LGBT people are also at an elevated risk.
Subproblems/target groups:
Reducing loneliness in specific age groups, for example:
Reducing loneliness in specific age groups, for example:
Reducing loneliness in different social classes
Reducing loneliness in big life changes
Gender-specific issues for loneliness
Reducing loneliness in different living environments
Reducing loneliness during a pandemic
How can technology reduce or increase loneliness
How can different stakeholders reduce or increase loneliness
Ideation
For the idea generation process, we used the following four methods, focusing on the quantity of solutions, and not quality or feasibility at this point.
1. Brainwriting
The first ideation method we started with was Brainwriting, where we writed down our ideas in repeated rounds, in a short time limit per round. This helped us generate 108 ideas in a 45-minute session.
2. Brainstorming
The second method we used was Brainstorming from the lecture slides. For this, we wanted to create some kind of structure for our idea generation process, and thus, we defined some subcategories for our problem, which we arranged around a Miro board, and started writing our ideas around each one, in a time limit. This method resulted in 140 ideas in 90 minutes. The below image depicts part of our Miro board layout:
3. Image Brainstorming
Image brainstorming, where we wrote ideas after seeing one image per minute for repeated rounds, was a very creative ideation method, and resulted in 130 ideas in around 30 minutes.
4. Reverse Brainstorming
As our last method, we decided to use reverse brainstorming, where we looked for solutions for a reversed version of our problem, i.e How to make people more lonely, and then transform the solutions to fit the original problem. This way we came up with our last 25 ideas.
Here is an example of our list after we reversed the solutions for our real problem:
Idea assessment & gathering requirements
After gathering and categorizing all individual ideas that were generated through the previous process, we assessed them iteratively, until the point where we ended up with a list of top-ten. These included ideas that we thought are easy to implement and applicable, they are simple and realistic concepts and could have an effect on people’s regular everyday life.
Selecting the ideas & requirements elicitation
For the final concept development, we wanted to focus on a digital product, so after researching the areas of our favorite digital ideas, we noticed that they were sortable into two categories:
finding new friends via mutual interests on online platforms for meeting people, and
online services that help provide psychological and emotional support.
Based on our research, we started to build a design concept around the three ideas that were the basis for the latter category:
peer support groups,
support people for the elderly without families, and
chat rooms for online mutual support.
We extended the concept to also consider providing support in a one-on-one setting with a professional besides the support groups. We decided to call this support website concept with the name Supportr.
The requirements prioritization process
In order to prioritize the requirements within each requirement type, we first started by identifying those that are most important for the service to exist, and then started discussing how important the secondary requirements are in relation to the core functionality of our application.
During our discussions on user requirements, we decided that peer support groups and private counseling sessions are the most important functions of our application, and they are supported by blog posts and chat rooms.
We ranked anonymity to be the most important after these four core functions as some people might turn away from our service if it is required to participate using one’s real name. At the same time, since anonymity may alter some people’s online behavior to be less civil, being able to moderate the chat rooms and content on our platform based on some rules/code of conduct should be the next priority.
As for the business requirements, we had three main ideas: donation functionality, memberships, and shop-for-a-cause service (in this order of priority). Donations are a low-barrier method for the users and other stakeholders to contribute to the service quality, and the donors can decide the sum that they personally wish and are able to donate. With paid memberships, we considered the users could also support the service and get access to a higher number of appointments or support groups, for instance: however, a membership might be less approachable than one-time donations to an average user. Finally, a merchandise shop on the website is another way to gather funds, but developing attractive products for the shop is no simple task, which is why this was of the lowest priority.
Regarding the functional requirements, we decided that the most important one is to provide a user identification process. In order for the user to be able to use our services, they need to have created an account and be logged in. Without being logged-in, they can see details about the offered services, make donations or shop purchases, or browse through the blog posts, but a user profile is required in order to book private appointments with professionals or to access peer support groups. Furthermore, through their profile page, the users can see information about their upcoming events, their recent activity and saved blog posts. The implementation of the next two functional requirements (video calls on zoom and chat functionality) follow the priority ranking as established in the user requirements process.
Wireframing Process
After deciding on the requirements, we discussed which ones we found central enough to meaningfully depict in the wireframes. In order to, firstly, visualise the hierarchy and structure of the webpages, we created a flowchart.
A flowchart for the Supportr design concept
Once we had discussed and agreed on the task flows and the views to wireframe, we divided them between the three team memers and moved on to drawing the wireframes individually. After the initial wireframing, we came back to discuss any details about the layouts and add some final touches so that the UI would feel decently consistent.
Sketches
Here are some of our initial sketches on paper, as well as on Figma:
Final Designs
At the end of this section, there is a video presenting all the interactions and functionalities of the prototype.
Decisions on the interactions as well as low fidelity sketches were made within the team, however, the UI of the final designs and the high fidelity prototype was individual work.
Colors:
Since it is a mental health support website, I opted for a color palette that evokes feelings of calmness, tranquility, and trust. Hence, I decided to use a series of shades of green, which are known to be associated with growth, balance, and stability, as well as to be providing a grounding effect. Some comments regarding the following pages:
Page titles included in all pages that serve as visual cues for the users to get an immediate view of where they are in the interface.
Back buttons that support user control, since the users can easily go back to the previous page and navigate more efficiently
Providing informative feedback to the users by adding confirmation pages after the “appointment reservation” and the “join group” actions.
Simple interfaces, clear information on each page
Anonymity is achieved by simply choosing either the “yes” or “no” state, through a toggle switch button (in the User Profile page).
Homepage The content in the homepage is organized by structuring pieces of information according to their relevant areas of action. We start by displaying the Services section, then the Blog and then the Support Us section, in order to establish visual hierarchy. In each section, we have grouped together the main functionalities that are related to each of them, in a concise structure. For example, in the “Our Services” section, we can see three main actions: the private appointments, the peer group support and the chat. These sections are arranged in an order to highlight their level of importance and guide the users to take the desired action. The “Our Services” section here, is displayed in prominent position in order to help the users directly understand what the website is about and the actions they can perform when they land on this page.
Homepage
1-1 private counselling booking page
The private counselling booking page can be accessed through the navigation bar or the services section in the homepage. Here, the confirmation button in the end is disabled until the user selects a time and date for the appointment.
Selecting private appointment & Confirmation page
Support Groups (Listing, Details, Confirmation)
The second service, the support groups, can also be accessed through the navbar or the homepage. The support groups are shown in a simple list structure which can be filtered based on group themes. The list items show the group name, the onset time, and a Show details button that opens the details bar below the item. In the detail bar, the user can see the group themes and size as well as the number of signed up users, the description of the group, a picture, and the signup button. Once the user has signed up, they are led to a confirmation page. The two buttons “View all Appointments” and “Edit Reservation” lead to a profile subpage, where the user can make changes or join their appointments.
Support groups listing, Details, and Confirmation page
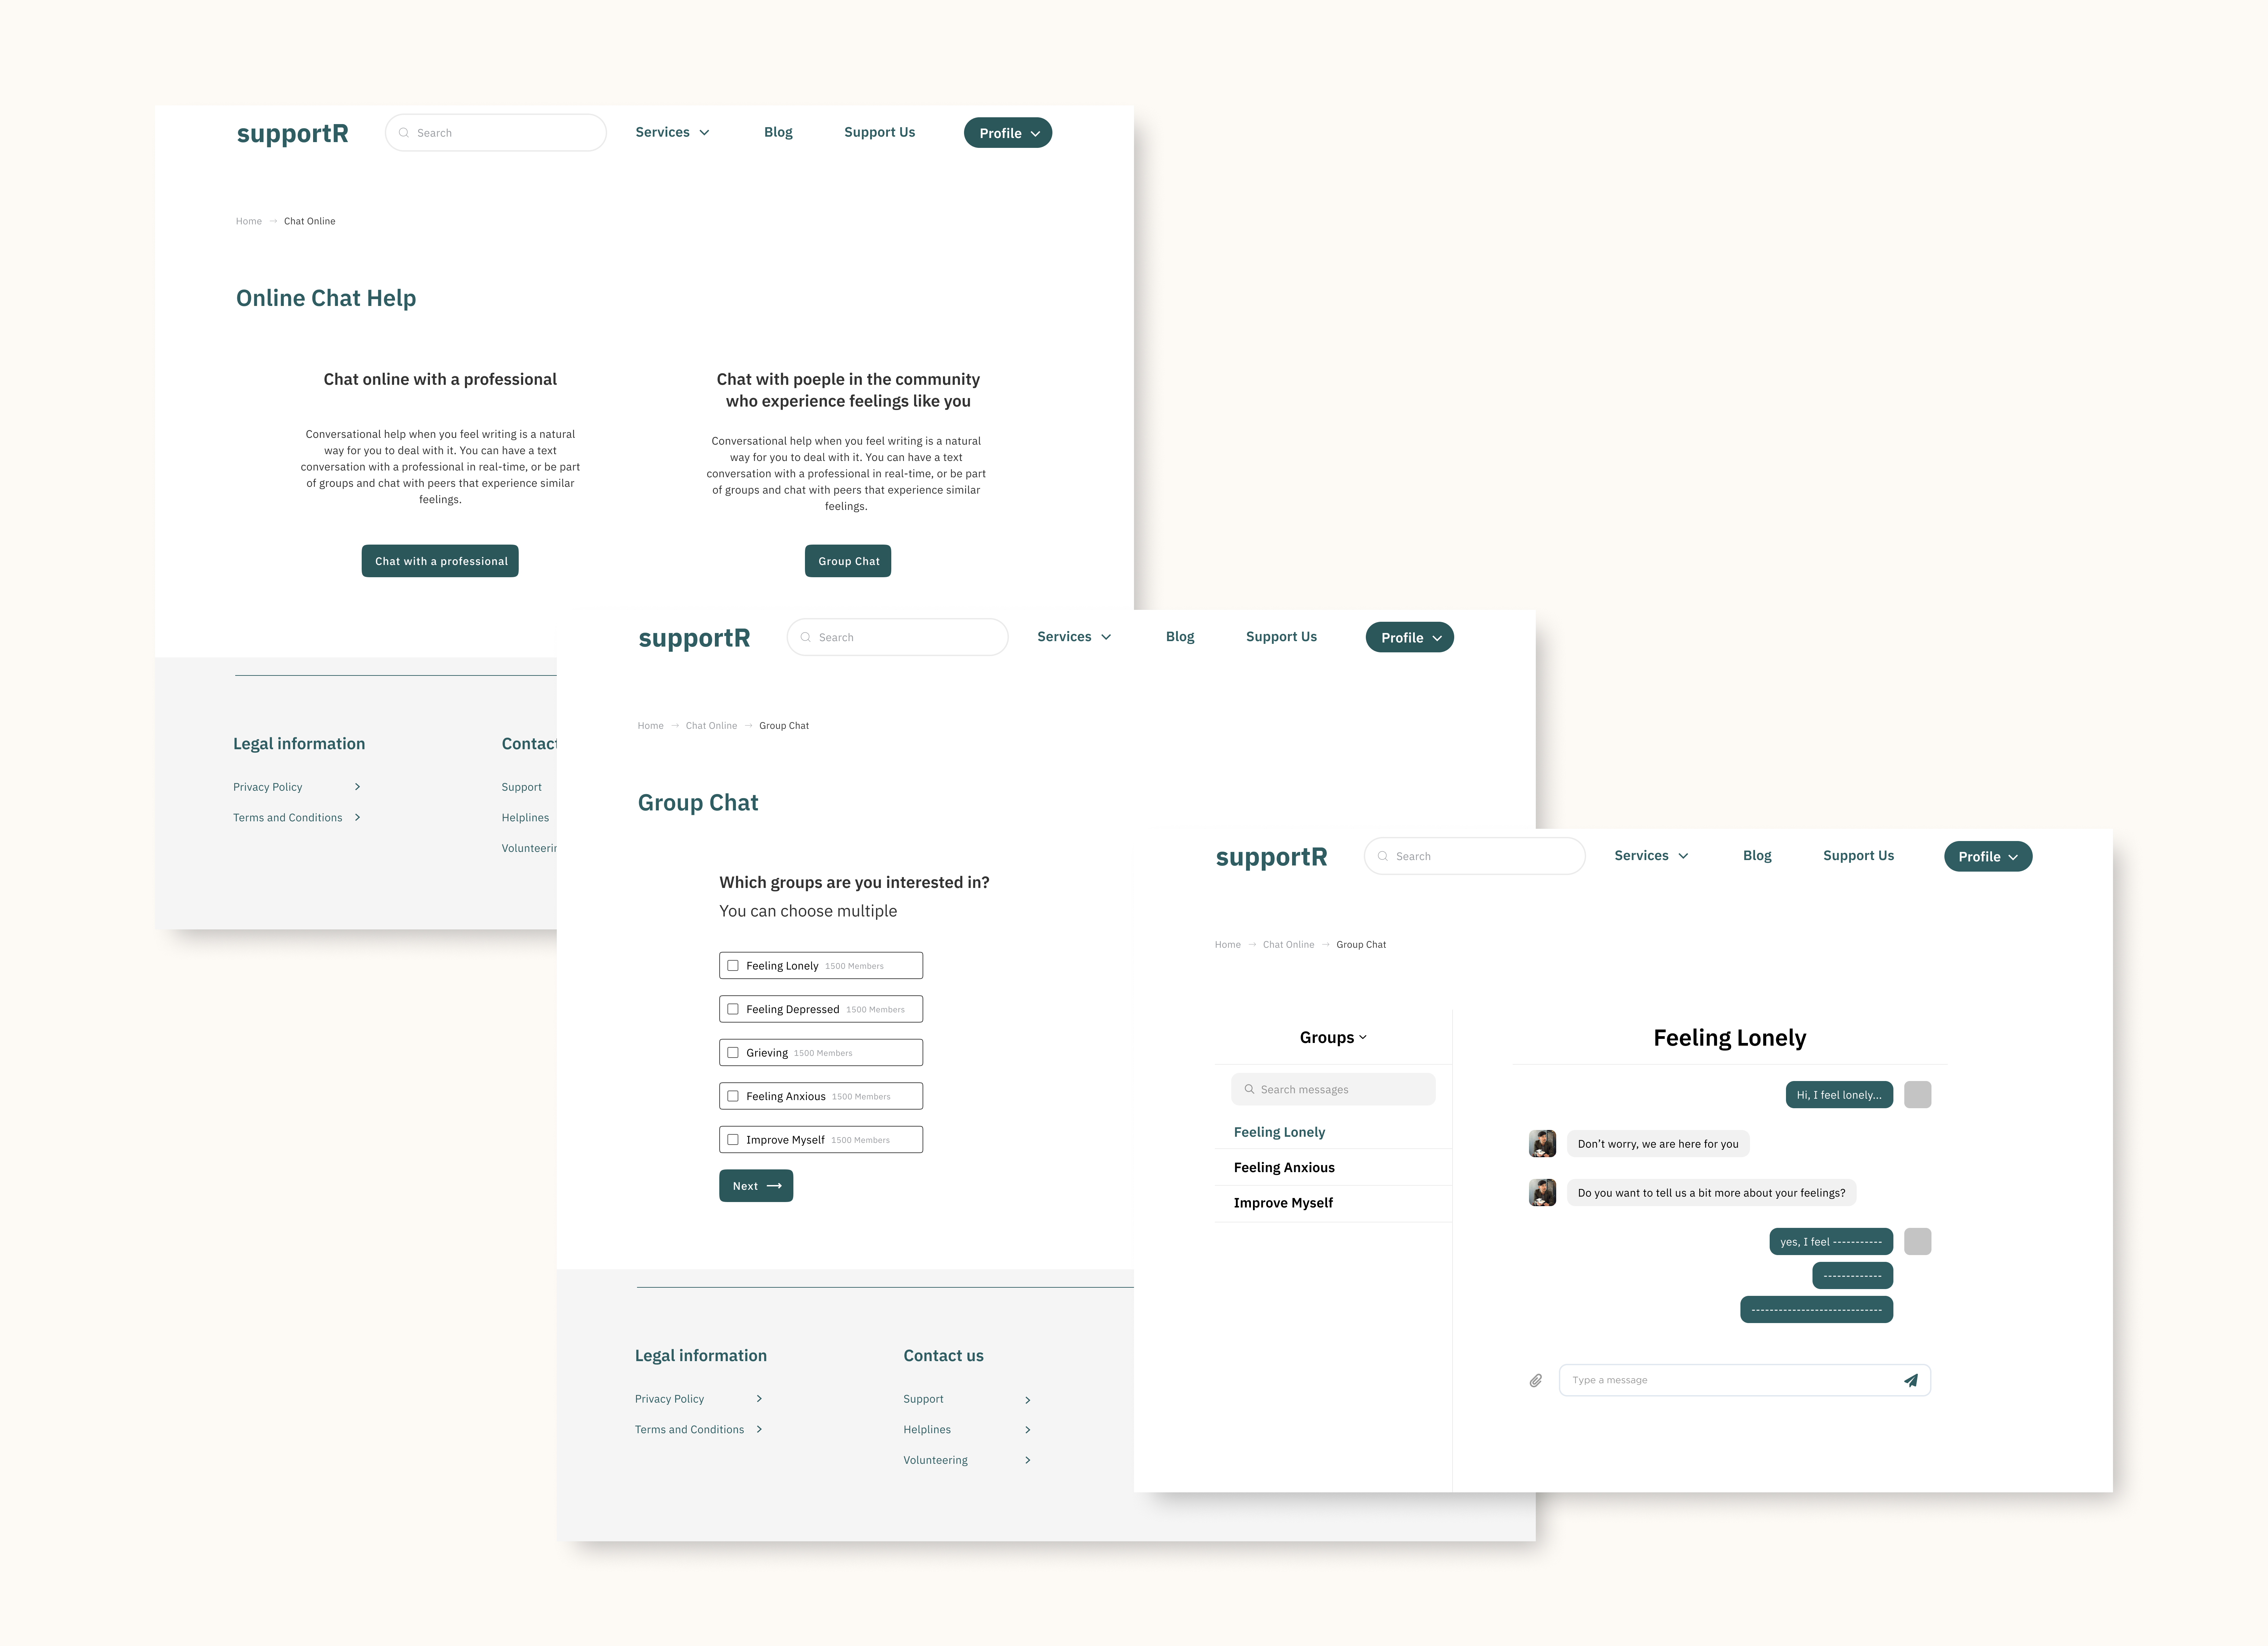
Online Chat Help
This is the third service which can also be accessed through the navigation bar or the homepage. For this service, the Group Chat functionality is shown, where the user can select the groups they are interested in before starting chatting.
Selecting chat, Selecting interest, and chat page
Donation Page
The service gathers low-barrier fundings with the donation page. There the user can see a description of the use of these funds, select their sum of donation out of pre-given option buttons or choose their custom sum, fill in the payment details, and finally submit the donation. Here, the last step of the flow is presented, where the user has already chosen an amount to donate. The interactive steps are presented in the video.
Donation Page
Profile Page
To keep the page organised, I included a menu on the left with links to all the profile subpages. Here, the welcome page features quick access to some of the most important functionalities, such as a preview of the upcoming events and the option to activate the anonymous profile. In the "My Appointments" page, the user can see the full list of the upcoming events or even past events, make edits to the appointments if needed, and finally select to join the meeting when the time has come (at the time of the meeting, rather than “Edit Reservation” the user would see the “Join Meeting” button).
Profile & My appointments pages
Video Prototype
Here is a video prototype showing the flow and basic functionalities of the app: